Inseam
What is your inseam measurement:
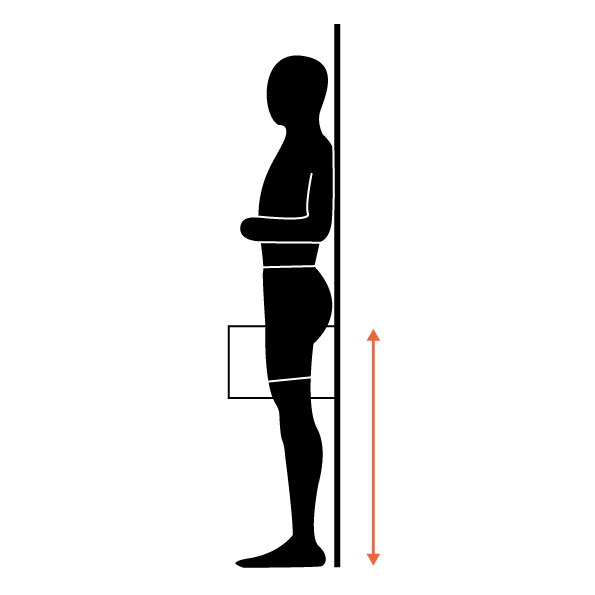
The inseam is the distance between your crotch and the floor, or the length of the inner leg. It is one of several measurements that play role in fitting a bike or positioning a bike saddle.
How to Measure your Inseam:
You can measure your inseam many ways, but the method we will recommend can be preformed with common items found around your home. Before You Start - make sure to wear the cycling bibs you use while riding but without shoes on.
- Step1. Grab a Book, Measuring Tape, a pencil, and a flat wall to stand against - if possible a wall where a pencil stroke won't be noticeable
- Step2. Stand with your back to the wall, take the book between your legs and pull the spine up into your crotch (see illustration). Make sure that the book is perpendicular to the wall. Now mark the wall at the top edge of the book.
- Step3. With the tape measure, measure from the floor to the mark on the wall.
Note: Please record this data in Millimeters
Select Your Crank Length (mm):
Your crank length can be measured by hand or in most cases the manufacture has printed its length on in the inside the crank. Crank length represents the distance between the center of the pedal axle to the center of the bottom bracket.
The most common lengths are 170mm, 172.5mm and 175mm, but the cycling industry has started to adopt a larger range of sizes, it is not uncommon to find cranks ranging between 160mm and 180mm.
Leg Flexion / Full Knee Extension
Why is the knee angle important?
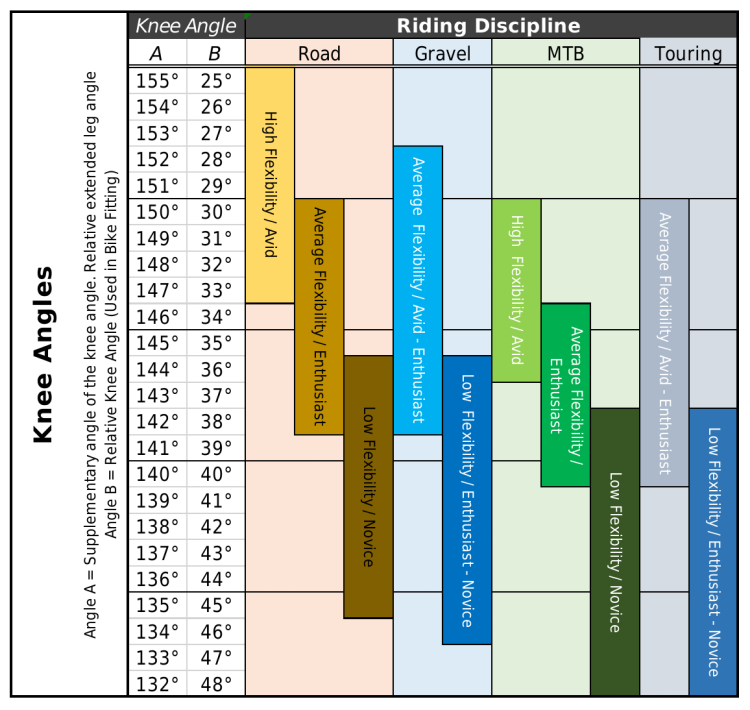
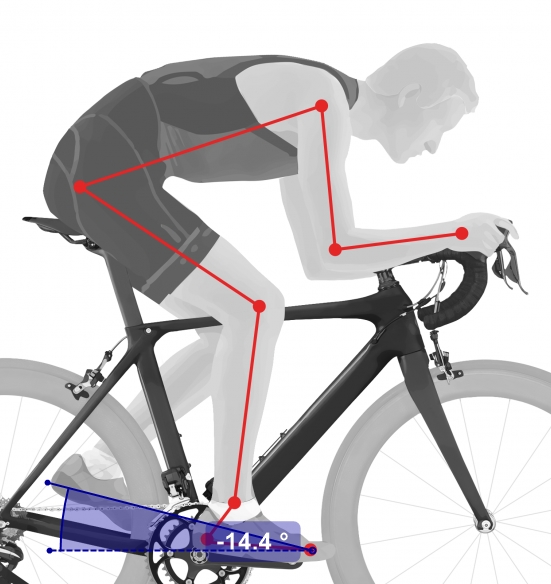
Considering the correct knee angle when determining the stattel height is very important as it affects efficiency, power requirements and comfort. Elite riders should use a significantly different angle than beginners to get the best bike fit for their individual needs. Therefore, there is no perfect knee angle, rather it is a specific and personal adjustment influenced by the rider's flexibility, fitness level and goals, and other factors. Knee angle can be measured in several ways. We measure it at the 6 o'clock position in the active state, as a static measurement does not give the same result.
What to Choose:
On the right side you will find a table that can help you determining your approximate knee angle. As a rule of thumb, the more flexible (what does flexible mean?) and experienced the rider, the longer the distance between the saddle and the pedal should be, i.e. the greater angle A. For less experienced riders, the opposite applies.
The average value in each category is suitable as a starting point
- Chart Guide (Discipline & Catagories):
- Race: Well-trained riders who want to continue to improve their performance and have the physical requirements to ride in this aggressive position.
- Endurance: This will be for most riders and generally a good place to start.
- Comfort: For newcomers but also for riders with limited flexibility or previous injuries.
There are many factors that would need to be considered to dial this figure in. Our Bike-Tailors are happy to help you find the perfect settings.
Shoe Size EU (Foot Length / Mondopoint)
What is Mondopoint Foot Length:
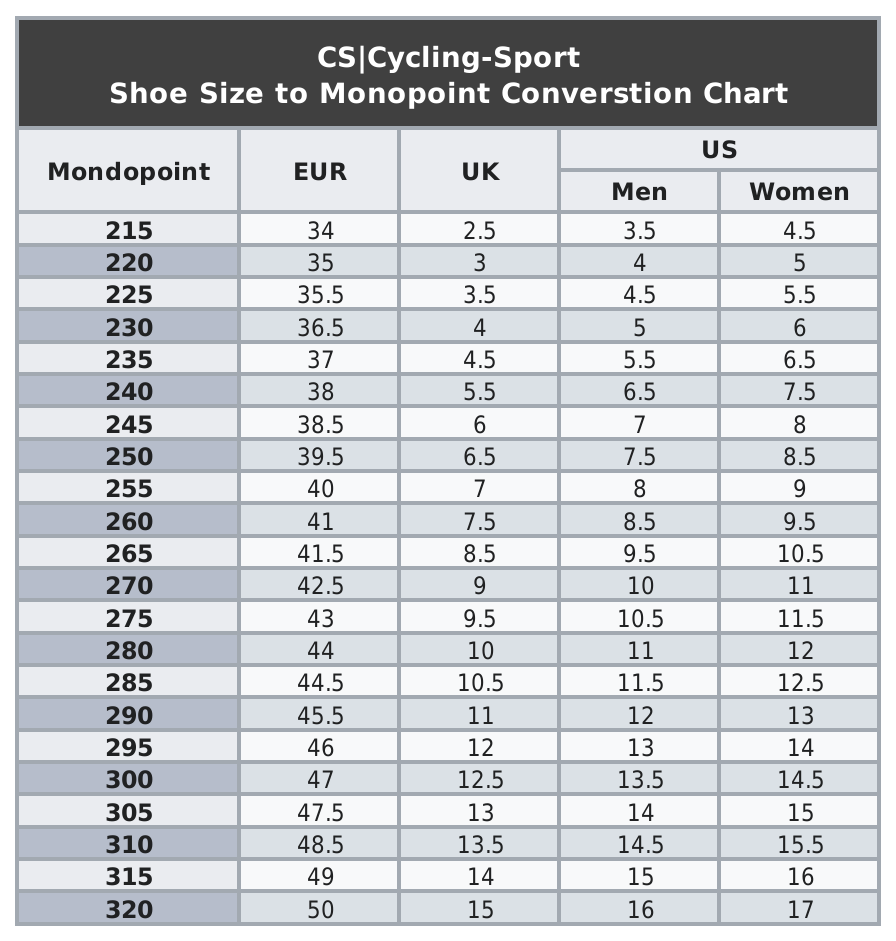
The Mondopoint Shoe Size is used in sports industry to size athletic shoes. The Mondopoint system is based on average foot length and foot width for which the shoe is suitable, measured in millimetres.
The length of the foot is measured as horizontal distance between the perpendiculars in contact with the end of the most prominent toe and the most prominent part of the heel.
How to Measure?
You can measure your foot precisely, or use the table on the right. If you know your shoe size, you can easily read the foot length according to Mondopoint.
Foot Position at Bottom of Pedal Stroke
Pedal Dynamics (Foot Position):
Understanding your natural foot position while cycling under "normal load" at a comfortable cadance is what we are looking for here. The angle can best be determined at a professional bike fitting. However, using our notes below will get you quite close.
Note on measurement
Your foot position changes with different loads:
High-Cadance / Low-Load Force: Most riders have a tendancy to pedal more "toe-down"
Low-Cadance / High-Load Force: Most riders have a tendancy to padal more "heal-down"
The key when measuring is to find out your "normal value" and include it in our calculation
Cleat Position On Shoe
Where is the cleat actually positioned?
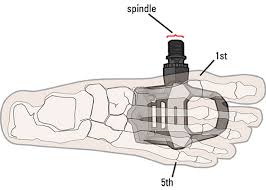
The cleat should be positioned so that the pedal axis lies between the 1st MTP joint (metatarsophalangeal joint) and the 5th MTP joint (metatarsophalangeal joint). Since the position of the foot in the shoes varies greatly from rider to rider, we resort here to the position of the plate on the shoe for simplicity. This is because most shoe manufacturers have the same cleat interface position that we can use as a reference point.
We use the shoe, not the foot!
Our Cleat Position measurement is relative to the location of the cleat on your shoe. This works well as a reference for calculating the saddle height. For the "Perfect Fit" we recommend having your feet measured by a bike fitter.
The CS Method
Why is it different?
There are many methods for finding your "ideal" saddle height. We felt that there was a better way. The final result might be different than what you are used to, but from a biomechanical standpoint, these calculations are surprisingly accurate. There is no magical formula for the perfect fit; we have bike tailors for that. But we do know this formula will get you into your fit window.
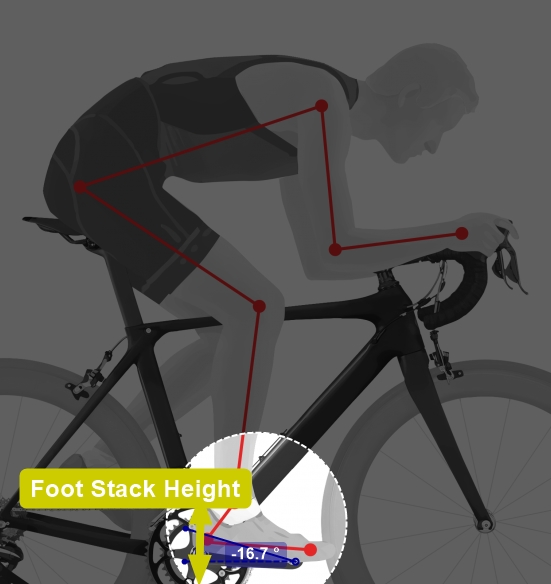
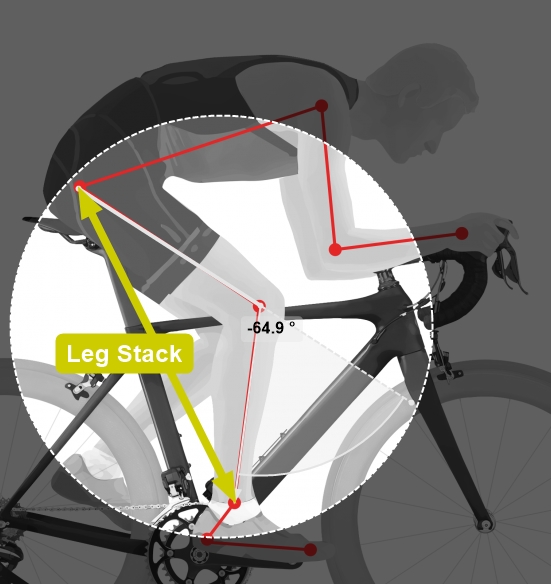
Two factors are used to find an accurate saddle height, Leg Stack Height & Foot Stack Height. Of course fine tuning happens in the variables: Saddle type and cleat interface.
Saddle to Bottom Bracket
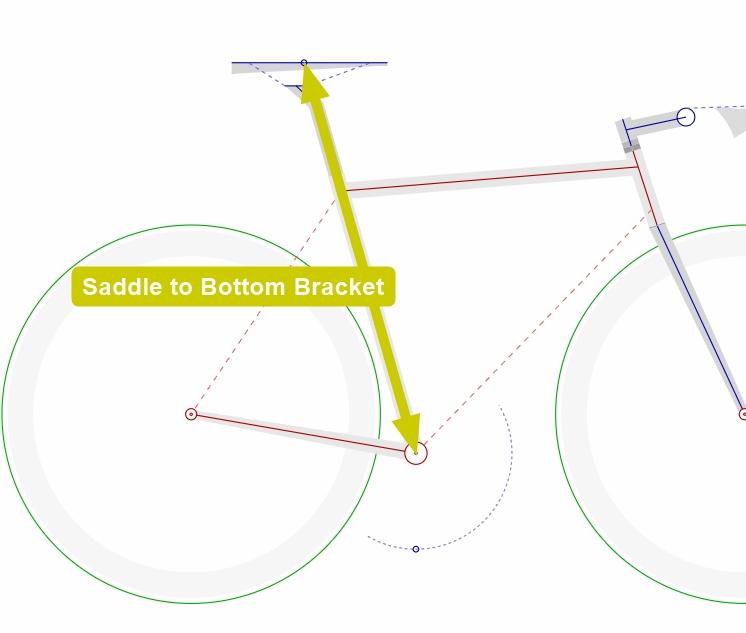
Saddle to Pedal
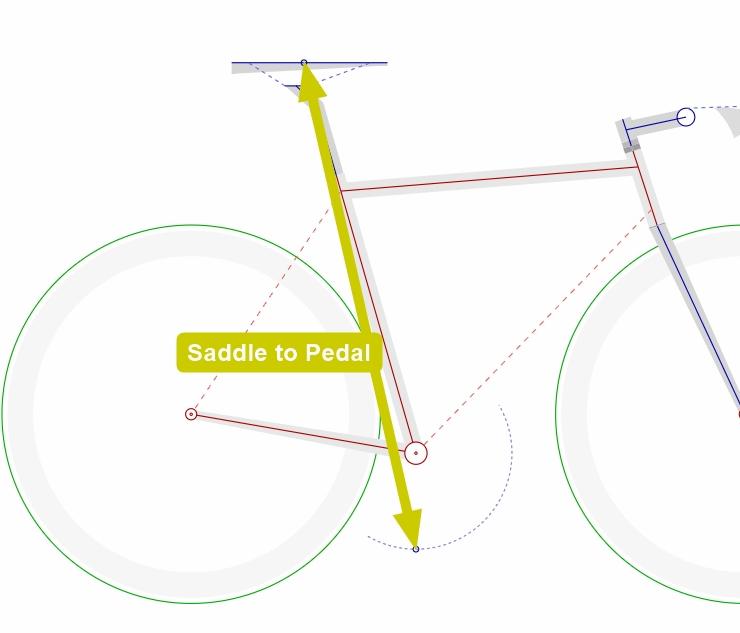
How did we do it?
Using your inseam length and knowing the desired knee angle, we can calculate your Leg Stack Height. Your leg stack height is the simplified measurement of your leg at the bottom of the pedal stroke.
Calculating your Foot Stack Height is found using foot length, cleat position, and pedaling style (pedaling dynamics). This measurement represents the elevated distance of the heal at the bottom of the pedal stroke parallel to the ground.
Foot Stack Height
Leg Stack Height
The LeMond Method
How:
Inseam x 88,3%
= Saddle Height (This measurement is from the bottom bracket to saddle top and is measured along angle of the seat tube)
Pros:
This measurement will be slightly different from the Hamely method. Peveler's study has shown that it's almost as accurate (65 percent) as the Hamley method in producing knee flexion angles between 25 and 35 degrees.
Cons:
While some prefer this method to the Hamely, it doesn't take into account the length of the crank arm. Because of this, saddle height usually ends up slightly lower than recommended.
The Hamley Method (109%)
How:
Inseam x 109%
= Saddle Height (from pedal axle to saddle top measured along the seat tube angle)
Take your inseam measurement several times to find an average.
Pros:
The rider has the optimal position to maximize performance when his/her perfect Kneww angle is achieved for most of the ridign time. An angle between 20-35deg is too wide oa range for this, moreover 67% of the ridign time means that for 1/3 of the riders, the angle is not ideal.
Cons:
The Peveler study determined that this method might not provide the optimal position for power output.
The Holmes method
How:
Place the bike in a stand or indoor trainer. With your cycling shoes on, rotate the pedal to bottom dead center (six o'clock). Have a partner use a goniometer to measure flexion in the knee joint.
Pros:
You'll get an accurate measurement of knee flexion with this method and can adjust accordingly.
Cons:
A goniometer will cost you a little money, and while it's not difficult, you'll need to know how to use it, which will require some basic knowledge of human anatomy.
Disclaimer
Subject to technical modification without notice.
Errors and omissions excepted.


